I am a clearance rack fanatic when it comes to shopping for clothing items (especially shoes, but we won't go there today!). However, in getting a good deal I tend not to get the lastest fashion. But lucky for me I'm not too much of a trendsetter so this kind of shopping is perfect for me; a win-win (a good deal and something new). I strongly believe that good style comes from accessorizing appropriately and in having a good fit (believe me the newest thing on the rack of Banana Republic or J. Crew that is too big or, for heaven's sake, too small will not look good on anyone, no matter what).

With all that said I have a closet full of items that are more on the bland side; meaning no frills or season specific styling. Lets be honest, when you see a non-season specific item on a clearance rack (i.e. a plain white t-shirt) you have a better chance of making it work in more situations than an in-the-moment-hot-off-the-runway shirt that you may only wear once. Make sense? Again its accessorizing it. In the case of the plain white t-shirt you can add a necklace (or two), a great pair of earrings and of course top it off with a bright pair of orange shoes and you are all set to rock the town. But I digress.

Back to my closet. Now that I'm in Florida I really don't have much of a demand for the stack of long sleeved t-shirts that I accumulated back up north. They were in a box ready to be donated to the local Goodwill until I came across a whole new world of refashioning. I have to say I have been simply amazed and super inspired to chop up my old, somewhat outdated clothes and make them new again. Of course, I have been hesitant at the same time because the thought of ripping apart something and having it look homemade didn't exactly appeal to me. But have you walked into
Anthropologie? This store seems to be all the rage for that casual chic style. And guess what...it all looks homemade (so much so that people are easily duplicating their style at home). So, I gave in and tried it out (I mean I was ready to give them away so if it didn't work out I wasn't really out anything).
What do you think of the 3 shirts featured above? Would you have guessed that only 2 days ago these were unworn long sleeved shirts that were shoved to the back of the closet? Well that is exactly what they were; long sleeved and unworn. The hardest part about adding a bit of flair to these
bland shirts was decided on the design. Once that was figured out it all went together quite smoothly, especially since with jersey material there is no need to hem (sweet).
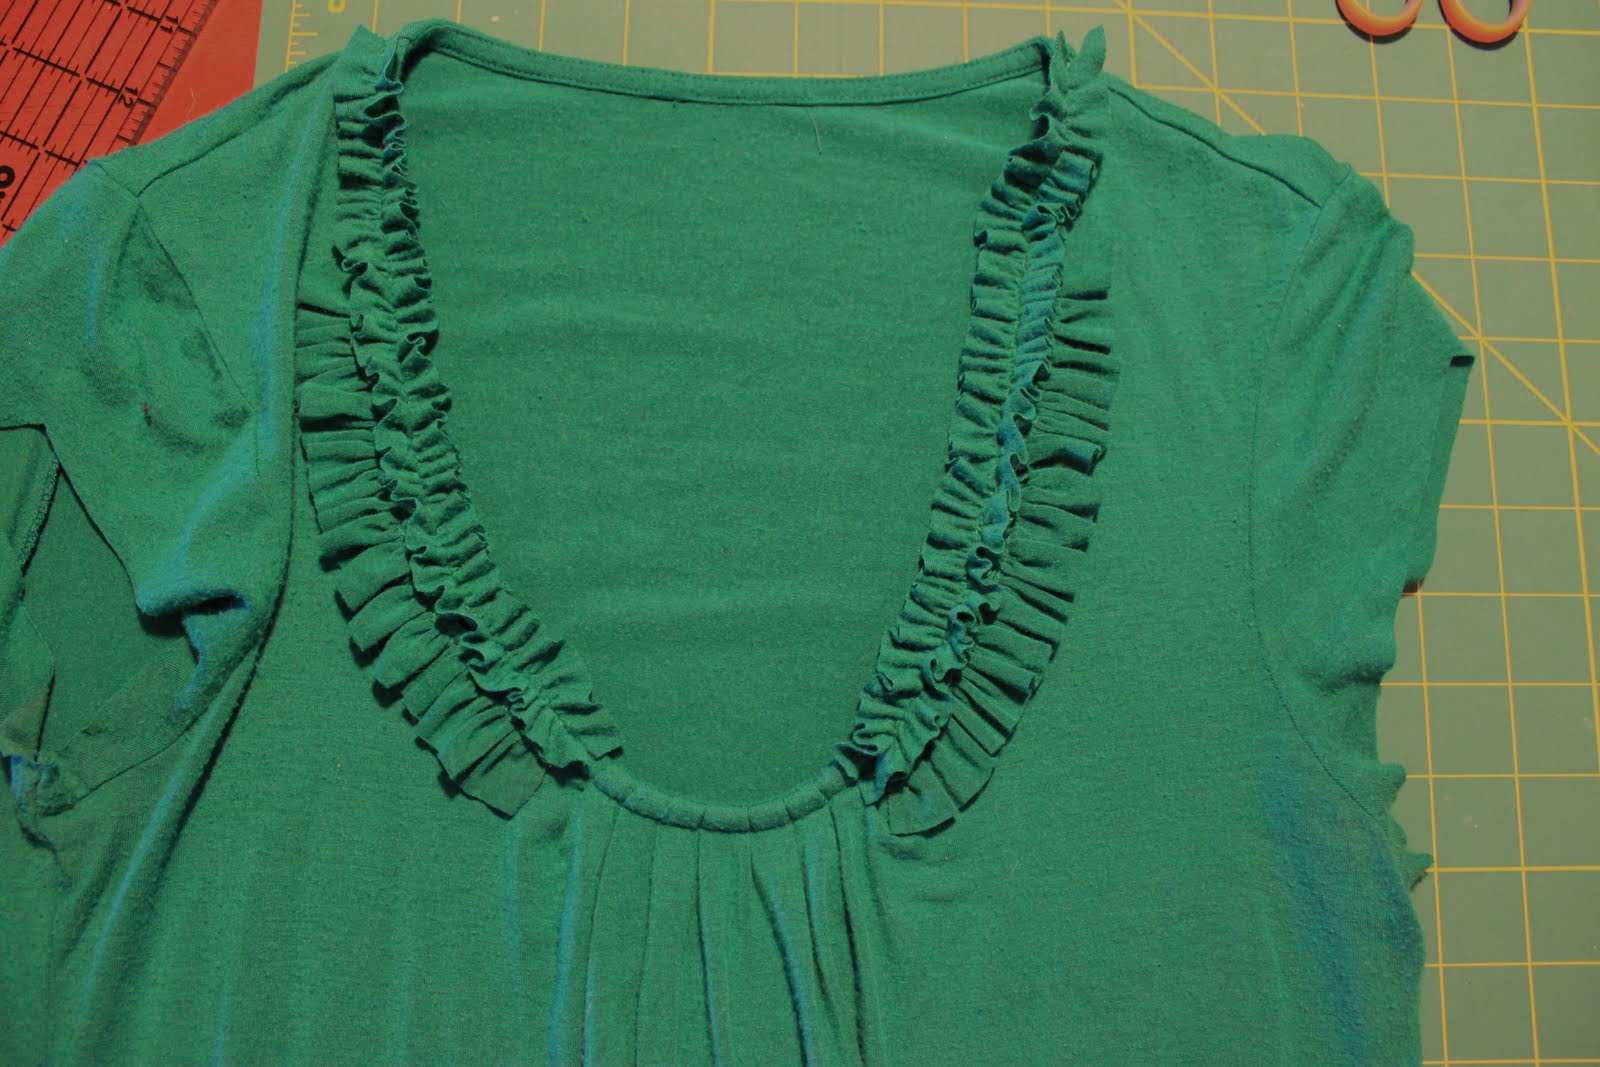
Want to see how I did it? Here are the few, but easy steps to accomplish the look. I'll show you the green shirt first (the one with the 2 rows of ruffles along the neckline). Then second I'll show you how I did the gray shirt (the v-neck shirt from above). The tank top version I'll wait until next time, but yup, you guessed it that used to be a long sleeve shirt as well.
Green Shirt Tutorial
1.) Find a long sleeved shirt that fits you well.
2.) Decide the length you want your finished sleeve to be (for me a 3" cap sleeve was perfect).
3.) Lets get started by laying your shirt flat and smooth on a cutting surface. Take the time to make sure there are no wrinkles in the sections you are going to cut. Since we are
not going to hem you want your cuts to be straight and not jagged.
4.) Measure your sleeve length, both at the top side of the sleeve and at the armpit area. For me I measured 3 inches from the shoulder seem and 1/2 inch from the armpit seem to create a cap type sleeve. Take a deep breath and make the cut. See not that bad.

5.) Do the same for the other sleeve.
**As a note, by cutting straight like I did above you will end up with a non-rounded cap sleeve. It will have an inverted squared look, like this (see pic below), see how the top edge of the sleeve squares off? I like the look as it kind of flatters the arm. But if you would like a more rounded sleeve see below.
**For a more rounded sleeve try this - at about a half inch from the top of the sleeve make your cut curve out a little bit, like this:
6.) Now that your sleeves are cut, you should have something that looks like this:
7.) Now lets move over to the sleeves that you just cut off. You will now cut off the cuff (if you have one) and cut off the seem down the length of the sleeve.
8.) Sorry, no picture of the next step, but I promise its easy! Lay your, what used to be a sleeve, flat out. Cut the fabrice into 1 inch strips. You can go wider if you want to make your ruffles a bit more noticeable. I like the 1 inch because it gives the shirt a bit of feminity without going overboard - all up to you.
9.) Make a ruffle. Take 2 of the longer strips and sew down the center of the strip - set your straight stitch length to the longest it will go. To ruffle just pull on one of the threads at the end and gently guide your fabric into a ruffled state of mind. Now take 2 other strips and sew down the far side of the strip (vs. the center of the strip as we did on the 1st 2 strips). This will just create a different looking ruffle - like this:

10.) Now take your ruffles on over to your new short sleeved shirt and find a design that you like. For me I choose to do the ruffles along the neckline. I did this a bit backwards, but I learned from my mistake and hopefully it will help you. I did not fully plan my design before going to the sewing machine. Therefore I sewed the ruffles down kind of out of order - not that it really mattered that much, just made sewing the ruffles down a little more time consuming. I had first layed down the top ruffle as seen below (this is the center sewed ruffle). However, had I known that I was going to do 2 rows of ruffles I would have put the second row down first.
11.) Pin the ruffle into place. Yes, you will need a lot of pins! (see pic above for reference)
12.) Now to sew the ruffle into place I changed my stitch length to 2 clicks shorter than the setting for ruffling (for me it was 4). To sew, do your best to stay on top of the stitching that you did to make the ruffle. As I found out this is not a perfect science and as long as you are close, you will never notice (unless of course you choose a thread color that is not the same as you fabric color). Repeat for other side of neckline.
13.) Now that your first ruffle is in place you can move onto the next. For the second row (or what should have been the first row) I used the ruffle where we sewed closer to the edge. I tucked it up under the top ruffle as best as I could and pinned like crazy. Then sewed it into place using the same guideline of sewing on top of the previously sewn stitch line.
14.) Now look at that, a new shirt to add to your closet! You can of course keep going crazy with the ruffles, remember you have a whole other sleeve that can be cut up! I choose to stop here cuz I'm a simple kind of girl and can only take so many ruffles at a time. But by all means have fun with it!
Gray (V-neck) Shirt Tutorial
1.) Follow steps 1 through 7 above to cut the sleeves off.
2.) Instead of cutting the sleeves into strips we are going to cut out a bunch of 3 inch circles. I used a drinking glass turned upside down and used my rotary cutter to cut them out, but do what works best for you.
3.) I cut a total of 15 circles. This of course all depends on your shirt design and the design you want to make. For me, one side of the v-neck took 8 circles and the other took 7. Take each of the circles and fold, creating about a quarter of an inch off center fold (in other words, not perfectly in half. You want to be able to see both edges of the circle).
4.) Now start to stack your off-centered folded circle along the neckline. I overlapped the circles by covering about half of the previous half circle. Again, use your discretion on design, but remember keep in mind your own style since you will definitely want to be showing off your new redesigned shirt!
5.) Now that you are happy with your design, pin the circles down and sew them into place. Be sure to sew close to the edge, but still catching the main shirt fabric. Also be sure to back stitch as each end since you want these to stay in place in the wash.
6.) Thats it. Put it on a feel proud that you were able to save a shirt and get some more wear out of it.
Let me know if you have any questions.
Enjoy!